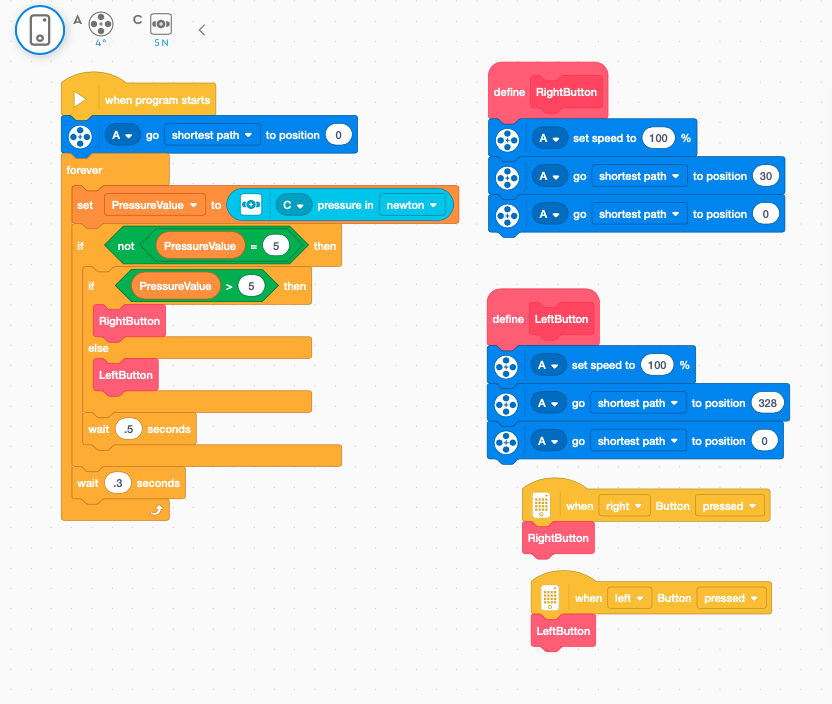
Program running on LEGO Hub
Before proceeding with the LEGO Word Block program, we have assumed that you have put your QikEasy Adapter into virtual sensor mode, if you haven’t done so, you can review the setup procedure here. The LEGO Work Block program will interpret the force received from the virtual adapter and control the lever to press on the underlying switch base on the force received.
The Word Block Program
There are 3 actions the program will preform.
- Rotate the lever bar to press the upper switch button of the rocker switch; then return to home position if the force received is greater than 50.
- Rotate the level bar to press the lower switch button of the rocker switch; then return to home position the force received is less than 50.
- Stay in the home position if the force received is exactly 50.
The program also accepts the left and right button to press the switch ON or OFF once when pressed.
Please also note that the force required to press the switch as well as the height of the switch various across installations. You may need to adjust the rotation angle and the force for your motor in the program. Our setting may not work on your switch. Please also note that the medium motor may not be powerful enough to control your switch. When we added a rubber band on the lever bar to reduce the wear and tear between the 2 hard plastic of the switch and the LEGO bar; we found that the medium motor installed is no longer powerful enough to press the switch. We have to remove the rubber band for the switch to work.
The logic for our Word Block program is very simple:
- When the Right button is pressed, rotate the motor to 30 degree then back to 0 degree. This is to press the ON button of the light switch.
- When the Left button is pressed, rotate the motor to 328 degree (-32) then back to 0 degree. This is the press the OFF button of the switch.
- In the main loop; first go to the middle position ( 0 degree ).
- If the force received is exactly 5 Newton; then wait for 0.3 second and then check again
- If the force received is larger the 5 Newton, simulate Right button pressed (ON). Wait for 0.5 second.
- If the force received is smaller the 5 Newton, simulate Left button pressed (OFF). Wait for 0.5 second.
- Later we will see that the Google script will set the force to bigger or smaller than 5N; delay a bit; and then revert back to a force setting of 5 Newton.
- Therefore the loop polling time is set to 0.3 to ensure a fast response and to make sure can be triggered within the 1 second interval.
- The delay time of 0.5 second after the lever movement is to reduce the possibility of pressing the button more than 1 time.

Testing the Robot using a URL:
The following 3 commands are used to test the Word Block Program. Please note that the “YourVirtualAdapterIPAddress” is the local IP address of the QikEasy Virtual Sensor.
“http://YourVirtualAdapterLocalIPAddress/set?t=f&f=60” — This command set the force setting of the virtual sensor to 6 Newton; upon receiving this value, the program will control the motor to press to press the light switch button to the ON position approximately every second.
“http://YourVirtualAdapterLocalIPAddress/set?t=f&f=40” — This command set the force setting of the virtual sensor to 4 Newton; upon receiving this value, the program will control the motor to press to press the light switch button to the OFF position approximately every second.
“http://YourVirtualAdapterLocalIPAddress/set?t=f&f=50” — This command set the force setting of the virtual sensor to 5 Newton; upon receiving this value, the program will return the lever to the centre position and wait for the next force command.
Tuning the Robot:
There are 3 parameters you can tune:
- On position of 30 degree. Depends on the physical set-up of your light switch, this may be larger or smaller.
- Off position of 328 degree. Depends on the physical set-up of your light switch, this may be larger or smaller.
- Wait time of 0.5 second. If you found that your switch is press more than once with Google home, you may increase this slightly to correct the issue.
Making the Word Block program visible to the outside world:
You will have to consult your router menu on how to port forward an external port to the http port of the QikEasy virtual wireless adapter (port 80). Please note that in our example; our external IP address is 154.20.239.19 and the external port we have chosen to forward to the virtual sensor is port 5566. Please note that some Internet Service Provider (ISP) may block your inward ports and the example here will not work for you. You will have to consult your ISP to see if they have blocked the ports for security concerns.
The Google App Script
The Google Apps Script is responsible for creating a single URL that will do the following 2 commands in sequences. First, the push button signal and Second the return to home position signal after some time. You will need a google account to complete this step. The following video above shows the setup process. The code is also capture below for reference. Please note that the code will send the force of 6N; then wait for 0.3 second and final send the force of 5N upon receiving the “ON” command. In addition, it will send the force of 4N; then wait for 0.3 second and final send the force of 5N upon receiving the “OFF” command. This step is completed on a computer.
function doGet(e) {
  // Parse the query parameters from the URL
  var params = e.parameter;
  var result = "OK";

  // Make a HTTP request to the specified endpoint
  if (params && params.set === "ON") {
    let resp = UrlFetchApp.fetch("http://154.20.239.19:5566/set?t=f&f=60");
  }
  else if (params && params.set === "OFF") {
    let resp = UrlFetchApp.fetch("http://154.20.239.19:5566/set?t=f&f=40");
  }
  else {
    result = "ERR";
  }

  if ( result === "OK") {
    // Delay by 1 second
    Utilities.sleep(500);

    // Return the switch to idling state
    let resp = UrlFetchApp.fetch("http://154.20.239.19:5566/set?t=f&f=50");
  }
    // Return the data as plain text output
  return ContentService
    .createTextOutput(result)
.setMimeType(ContentService.MimeType.TEXT);
}
Please note that you will have to replace the IP address “154.20.239.19:5566” with your own external IP address and port. We are not covering the port forwarding details here as it is router specific; you will have to consult your routers user manual. You may also need to check with your ISP to see if the inbound ports are blocked.
Testing The Google Apps Script
As shown on the video below, you can test the Google Apps Script by appending the strings,”?set=ON” and “?set=OFF”, to the Web App URL copied from the deployment step.