High Precision Internet Clock

In this demo, we will showcase how QikEasy’s Virtual Wireless Sensor feature can be utilized to allow your LEGO hub to receive data from an external source. Specifically, for our project, we will transmit the current time to your LEGO hub, which will be extremely accurate due to its synchronization with the Network Time Protocol (NTP) over the internet.


Overview


QikEasy Virtual Wireless Sensor enables the LEGO robotic hub to receive “hour” and “minute” data from an accurate source.  In our implementation, this source can either be a desktop computer or a microcontroller.  And in either way, the computer or microcontroller will have very accurate time because its time is calibrated through NTP over the internet.

Prerequisites


To follow this tutorial, you must prepare these before starting the project:


    • Either:
      • A Mindstorms Robot Inventor set
      • OR a SPIKE Prime Set + a SPIKE Prime Expansion Set
    • A hardware to run the server to send QikEasy Adapter the time data:
      • a computer setup to run node.js apps or python apps,
      • Or an ESP8266 microcontroller


    • Your QikEasy Adapter must be setup to run in Virtual Wireless Sensor mode.  See instructions on how to set that up here.

Building the LEGO Clock


Please follow the video below to build this Internet Clock with your Spike Prime or Robot Inventor LEGO set.  The video below shows the version for the Robot Inventor set.

For the SPIKE Prime version, please DOWNLOAD the SPIKE Prime Internet Clock Building Instructions document for full building instructions.


Note that the SPIKE Prime version requires the SPIKE Prime Expansion Set (45680 or 45681).  In particular, it requires these parts that have no replacement alternatives in the SPIKE Prime Set:

Calibrating the Hour and Minute Hands


For the VERY FIRST TIME, after you set the program in your LEGO app, run it, and immediately STOP the app by pressing the big button on the hub as soon as you hear the Laser Alert sound.  Both hands should have rotated a little, and if they are calibrated correctly, they should be at the 12 o’clock position of the clock.  If not, please read next paragraph to see how to make the proper adjustments.


After the initial motor positions are set as in the previous paragraph, you may now adjust the hands’ positions by pulling them out and orienting them to the 12 o’clock position on the clock.  Once they are oriented correctly, you should push the hands in and lock them in the correct positions.  You only need to do this calibration the very first time you run the program.  However, the setup procedure for the Hour hand presented later on should still be followed every time you start the LEGO app.

A Server Sending Time to Our LEGO Project


As seen in the diagram above, we present 3 different possible implementations of this server: two for desktop computer, and one for an ESP8266 microcontroller. You may choose to use any one of these implementations based on the hardware you own and your skill set.

Node.js Server


Remember to change the QikEasy Virtual Sensor’s IP Address in the source code.


const qikeasyAddr = "192.168.11.102";
const http = require('http');

// Call setInterval to repeatedly execute the code inside the arrow function
setInterval(() => {
  // Get the current time as a Date object
  const now = new Date();

  // Get the hour and minute from the Date object
  let hour = now.getHours();
  let minute = now.getMinutes();

  // If the hour is greater than 12, subtract 12 to convert to 12-hour format
  if (hour > 12) {
    hour -= 12;
  }

  // Scale the hour and minute values from the raw value range 0-1024 to range 0 to 255
  // Note: - the more accurate way to calculate this should be X * 1024 / 255.
  //       - for our use of X running up to 60, X * 4 yields the same results. 
  const scaled_hour = hour * 4;
  const scaled_minute = minute * 4;

  // Build the URL for the HTTP GET request
  const url = `http://${qikeasyAddr}/set?t=c&r=${scaled_hour}&g=${scaled_minute}`;

  // Send an HTTP GET request to the specified URL
  http.get(url, (res) => {
    // When a response is received, log the current hour and minute to the console
    res.on('data', (data) => {
      // Use padStart to add leading zeros to the hour and minute values
      // to ensure they are always two digits long
      console.log(`${hour.toString().padStart(2, '0')}:${minute.toString().padStart(2, '0')}`);
    });
  }).on('error', (err) => {
    // If there is an error with the HTTP request, log the error message to the console
    console.error(`Error: ${err}`);
  });
}, 1000);  // Execute the arrow function every 1000 milliseconds (i.e. once per second)

Python Server


Remember to change the QikEasy Virtual Sensor’s IP Address in the source code.


import http.client    # import the HTTP client library
import time           # import the time library for sleep and localtime functions

qikeasyAddr = "192.168.11.102"

while True:           # keep the loop running indefinitely
    now = time.localtime()     # get the current local time
    hour = now.tm_hour         # extract the hour from the time tuple
    minute = now.tm_min        # extract the minute from the time tuple

    if hour > 12:              # if the hour is greater than 12, subtract 12 to convert to 12-hour format
        hour -= 12


    # Scale the hour and minute values from the raw value range 0-1024 to range 0 to 255
    # Note: - the more accurate way to calculate this should be X * 1024 / 255.
    #       - for our use of X running up to 60, X * 4 yields the same results.
    scaled_hour = hour * 4
    scaled_minute = minute * 4

    conn = http.client.HTTPConnection( qikeasyAddr )     # create an HTTP connection to the specified IP address
    conn.request("GET", f"/set?t=c&r={scaled_hour}&g={scaled_minute}")    # send a GET request with the scaled hour and minute values in the URL
    response = conn.getresponse()    # get the response from the server
    print(f"{hour:02d}:{minute:02d}")    # print the current time in 12-hour format with leading zeros for single-digit hours and minutes
    conn.close()    # close the HTTP connection

    time.sleep(1)   # wait for 1 second before the next iteration of the loop

ESP8266 Server


For this implementation, we provide you source code that works with ESP8266 Arduino environment.


Note:

    • Remember to change the QikEasy Virtual Sensor’s IP Address in the source code
    • Also, change the Wifi SSID and Password

#include <ESP8266WiFi.h>
#include <WiFiUdp.h>
#include <NTPClient.h>
#include <ESP8266HTTPClient.h>
#include <WiFiClient.h>


// Replace with your network credentials
const char* ssid = "<Your SSID>";
const char* password = "<Your Wifi Router Password>";
const int timezone_offset = 8;      // Timezone offset (e.g. 8 means GMT+8)

// Replace with your QikEasy Virtual Wireless Sensor's IP address
const char* qikeasyAddr = "192.168.11.102";
const int qikeasyAdapterPort = 80;

// NTP server settings
const char* ntp_server = "pool.ntp.org";
const int ntp_offset = timezone_offset * 3600;  // Timezone offset in seconds

// Create an instance of the NTPClient class
WiFiUDP ntp_udp;
NTPClient ntp_client(ntp_udp, ntp_server, ntp_offset);

void setup() {
  Serial.begin(115200);
  delay(10);

  // Connect to Wi-Fi network
  WiFi.begin(ssid, password);

  while (WiFi.status() != WL_CONNECTED) {
    delay(500);
    Serial.print(".");
  }
  Serial.printf("\nWiFi connected\n");

  // Initialize the NTP client
  ntp_client.begin();
  ntp_client.setTimeOffset(ntp_offset);
}


const unsigned long timerDelay = 1000;
unsigned long lastTime = 0;

void loop() {
  HTTPClient http;
  WiFiClient WiFiClient;

  // Send new time to QikEasy Virtual Sensor once every second
  if ((millis() - lastTime) > timerDelay) {
    // Update the NTP client and get the current time
    ntp_client.update();
  
    // Get the hour and minute from NTP client
    int hour = ntp_client.getHours();
    int minute = ntp_client.getMinutes();
  
    // If the hour is greater than 12, subtract 12 to convert to 12-hour format
    if (hour > 12)
      hour -= 12;
  
    // Scale the hour and minute values from the raw value range 0-1024 to range 0 to 255
    // Note: - the more accurate way to calculate this should be X * 1024 / 255.
    //       - for our use of X running up to 60, X * 4 yields the same results. 
    const int scaled_hour = hour * 4;
    const int scaled_minute = minute * 4;
  
    // Build the URL for the HTTP GET request
    String url = "http://"+ String(qikeasyAddr) + "/set?t=c&r=" + String(scaled_hour) + "&g=" + String(scaled_minute);
  
    // Send the HTTP GET request to the QikEasy Virtual Wireless Sensor
    http.begin(WiFiClient, url);
    int http_code = http.GET();
  
    // Check for a valid HTTP response
    if (http_code >0 && http_code == HTTP_CODE_OK)
      // When a response is received, log the current hour and minute to the console
      Serial.printf("%02d:%02d\n", hour, minute);
    else      
      Serial.printf("HTTP error code: %d\n", http_code);
    
    // Free resources
    http.end();
  
    lastTime = millis();
  }
}

Client Program on LEGO Hub


We provide 3 possible implementations of the program for our Internet Clock to be run on the hub: two are Word Block programs and one is a Python program.  Again, you may choose the implementation best for you based on your skill set.  If you are to use Word Block to program your client, please make sure you choose the appropriate one based on the version of Spike App you are using.


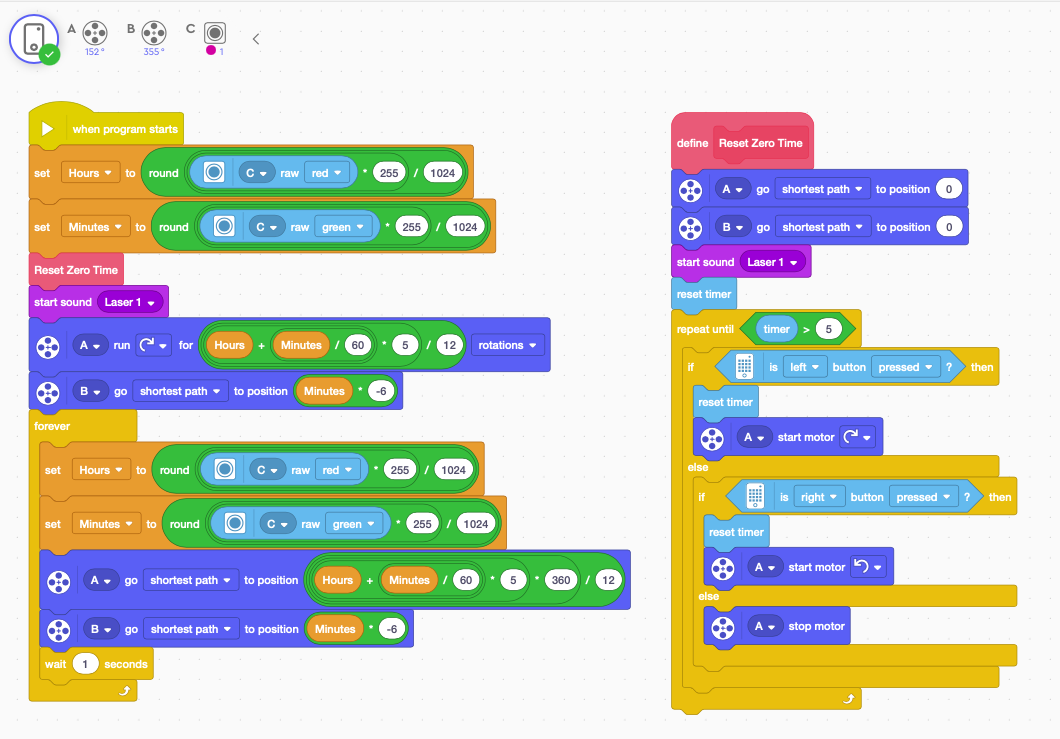
How the Client Program Works


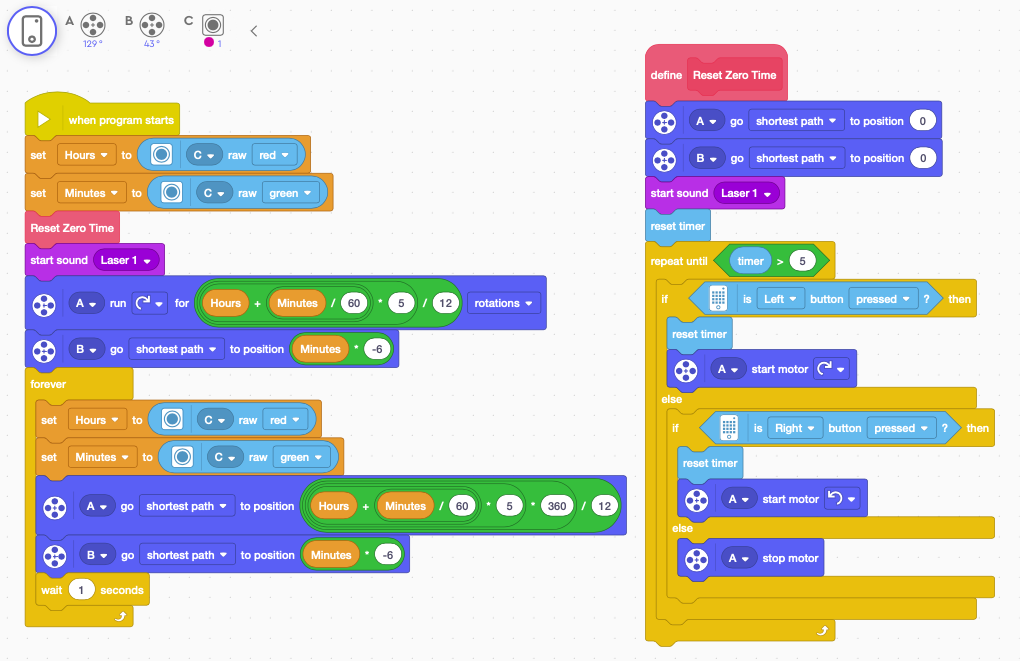
Within the client program, the Virtual Sensor’s received hour and minute data are always stored in the variables Hours and Minutes, ready to be used any time.


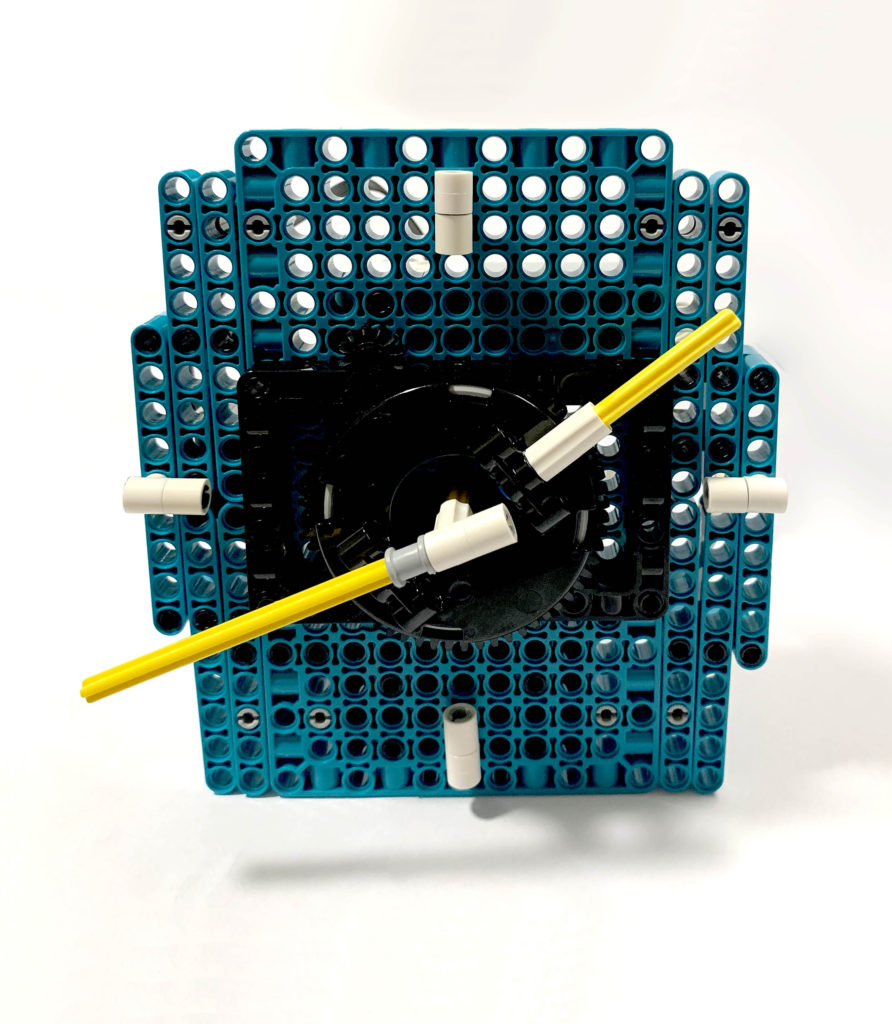
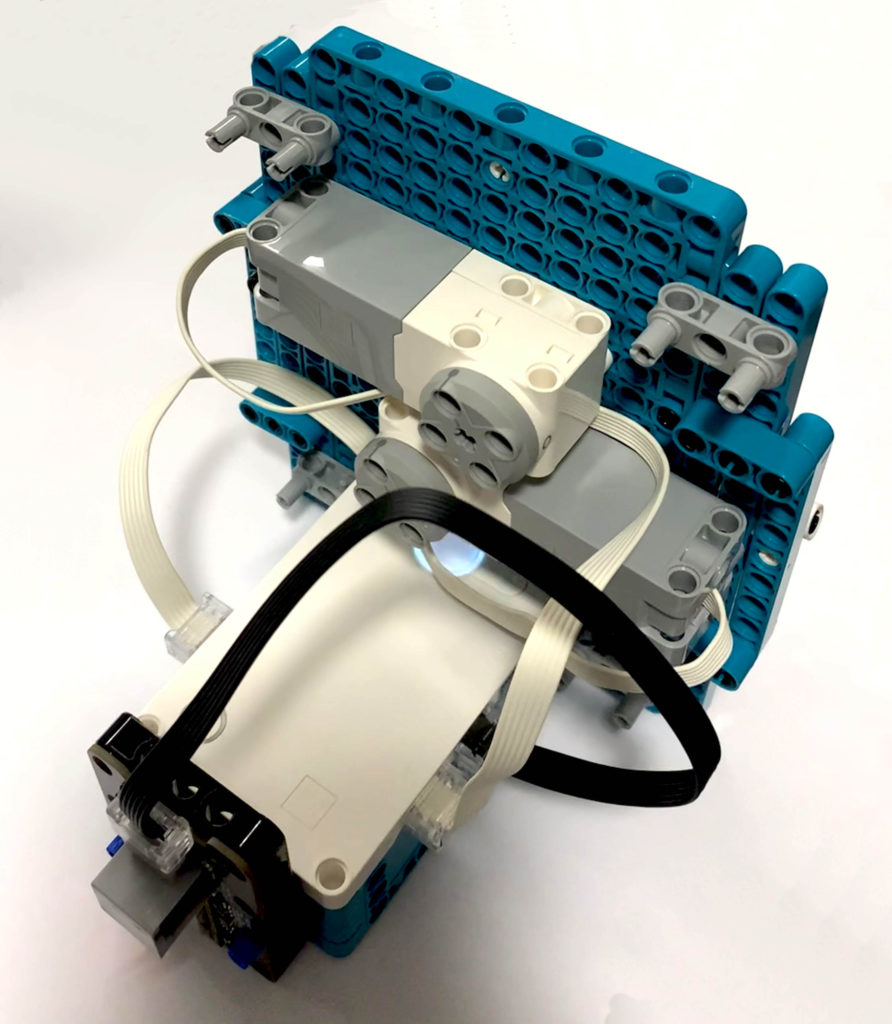
At the beginning, the program will reset the hour and minute hands to zero position to be ready for calibration.  For the minute hand, it is directly attached to one of the Spike Prime motors.  This minute hand relies on Spike Prime Motor absolute positioning to accurately set its position for the received time.  For the hour hand, its driving motor has a 12 teeth gear attached, the gear drives another 30 teeth gear that the hour hand is attached too.  Because of the gear ratio, it requires 5 full motor rotations in order for the hour hand to complete a full 12 hour rotation.  For this reason, we cannot use absolutely positioning to fix its location, as it may require multiple motor rotations to position the hour hand correctly.  Therefore at the beginning of the program, a laser sound is played, the end user must use the left and right button on the hub to set the hour hand’s position to 12 o’clock.  Once set, do not touch any key for 5 seconds, and the motor for both the hour hand and minute will be rotated to the correct positions according to the time received.  Once this initial position is set, we rely on the fact that the relatively movement require to get to the correct position should be small, and we use the “go shortest path to position” function to get the hour hand iteratively.


Choose one of the 3 options for Programming the Client to be run in the Hub:


    • Word Block for Spike App 2 or Robot Inventor
    • Word Block for Spike App 3
    • Python Program


Word Block Program on Spike App 2 or Robot Inventor


Word Block Program for Spike App 3


Because Spike App 3 sees Color Sensor Raw RGB data in the range 0 to 1024, instead of 0 to 255 in the previous version of the App, we will have to adjust our program slightly.


Python Program for running on the Hub

from spike import PrimeHub, Button, ColorSensor, App, Motor
from spike.control import wait_for_seconds, Timer
from math import *

app = App()
hub = PrimeHub()
virtualSensor = ColorSensor('C')
motorHour = Motor('A')
motorMinute = Motor('B')
timer = Timer()

Hours = round(virtualSensor.get_red()*255/1024)
Minutes = round(virtualSensor.get_green()*255/1024)

def ResetZeroTime():
    motorHour.run_to_position(0)
    motorMinute.run_to_position(0)
    app.start_sound('Laser 1')
    timer.reset()
    while True:
        if timer.now() > 5:
            break
        if hub.left_button.is_pressed():
            timer.reset()
            motorHour.start(100)
        elif hub.right_button.is_pressed():
            timer.reset()
            motorHour.start(-100)
        else:
            motorHour.stop()

ResetZeroTime()
app.start_sound('Laser 1')

motorHour.run_for_rotations( ( Hours + (Minutes/60) ) * 5 / 12 )
motorMinute.run_to_position( (Minutes * -6) % 360 )

while True:
    Hours = round(virtualSensor.get_red()*255/1024)
    Minutes = round(virtualSensor.get_green()*255/1024)
    motorHour.run_to_position( round( ( Hours + (Minutes/60) ) * 5 * 360 / 12 ) % 360 )
    motorMinute.run_to_position( (Minutes * -6)  % 360)
    wait_for_seconds(1)

Conclusion


QikEasy Adapter’s Virtual Wireless Sensor provides boundless integration opportunities with all sorts of data sources available over the network.  This project presents only one of its possible use.  You may visit our Virtual Wireless Sensor documentation page for more fun and interesting ideas.