This documentation is for QikEasy Adapters with the latest firmware v10 or above. If your QikEasy Adapter is with firmware v9 or older, you should go to this page instead. We strongly recommend you to upgrade your QikEasy Adapter with the latest firmware.

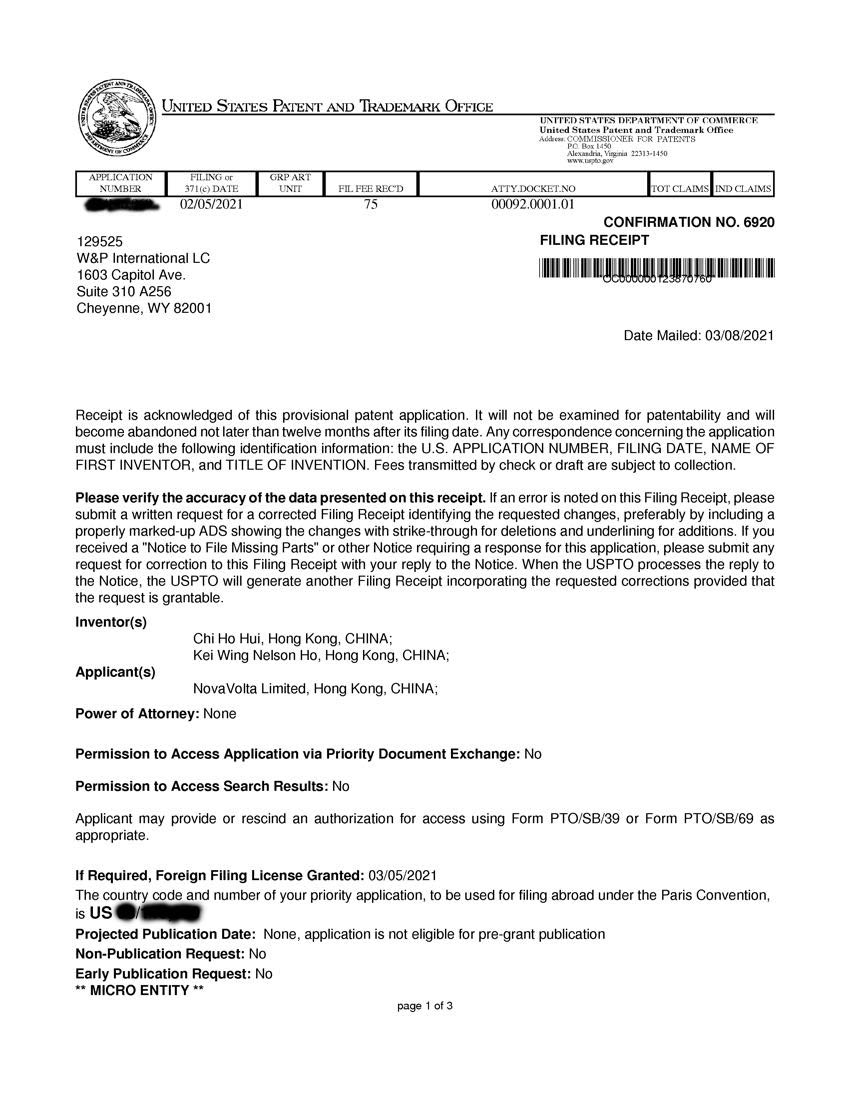
Infrared Sensor
With QikEasy EV3 Spike Prime Adapter, you may use your EV3 Infrared Sensor and Remote Control, and have functionalities that you don’t get with your standard Spike Prime or Robot Inventor kit.
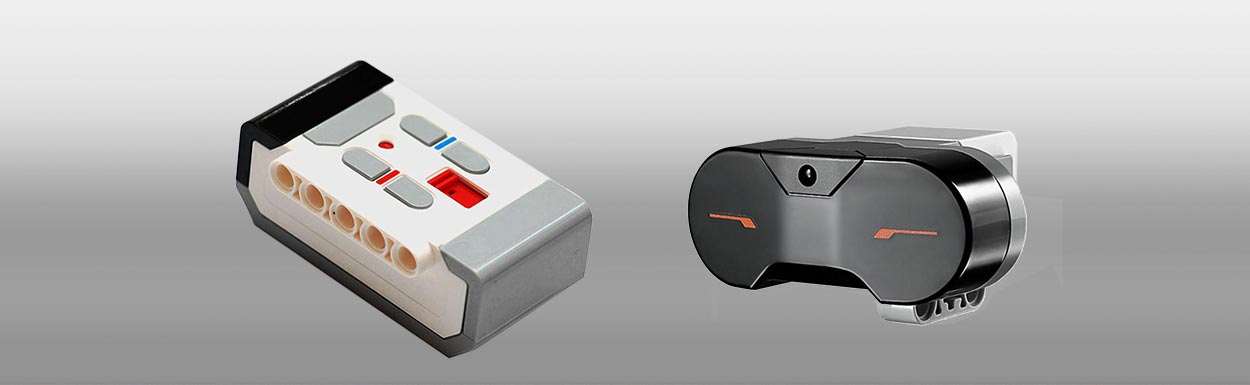
A Wireless Remote with Physical Buttons
- Control your robot with a handy physical remote control. The tactile controls is much easier to use than your smart phone’s touch screen.
- Great for wirelessly controlling your model race car or other robotic projects.
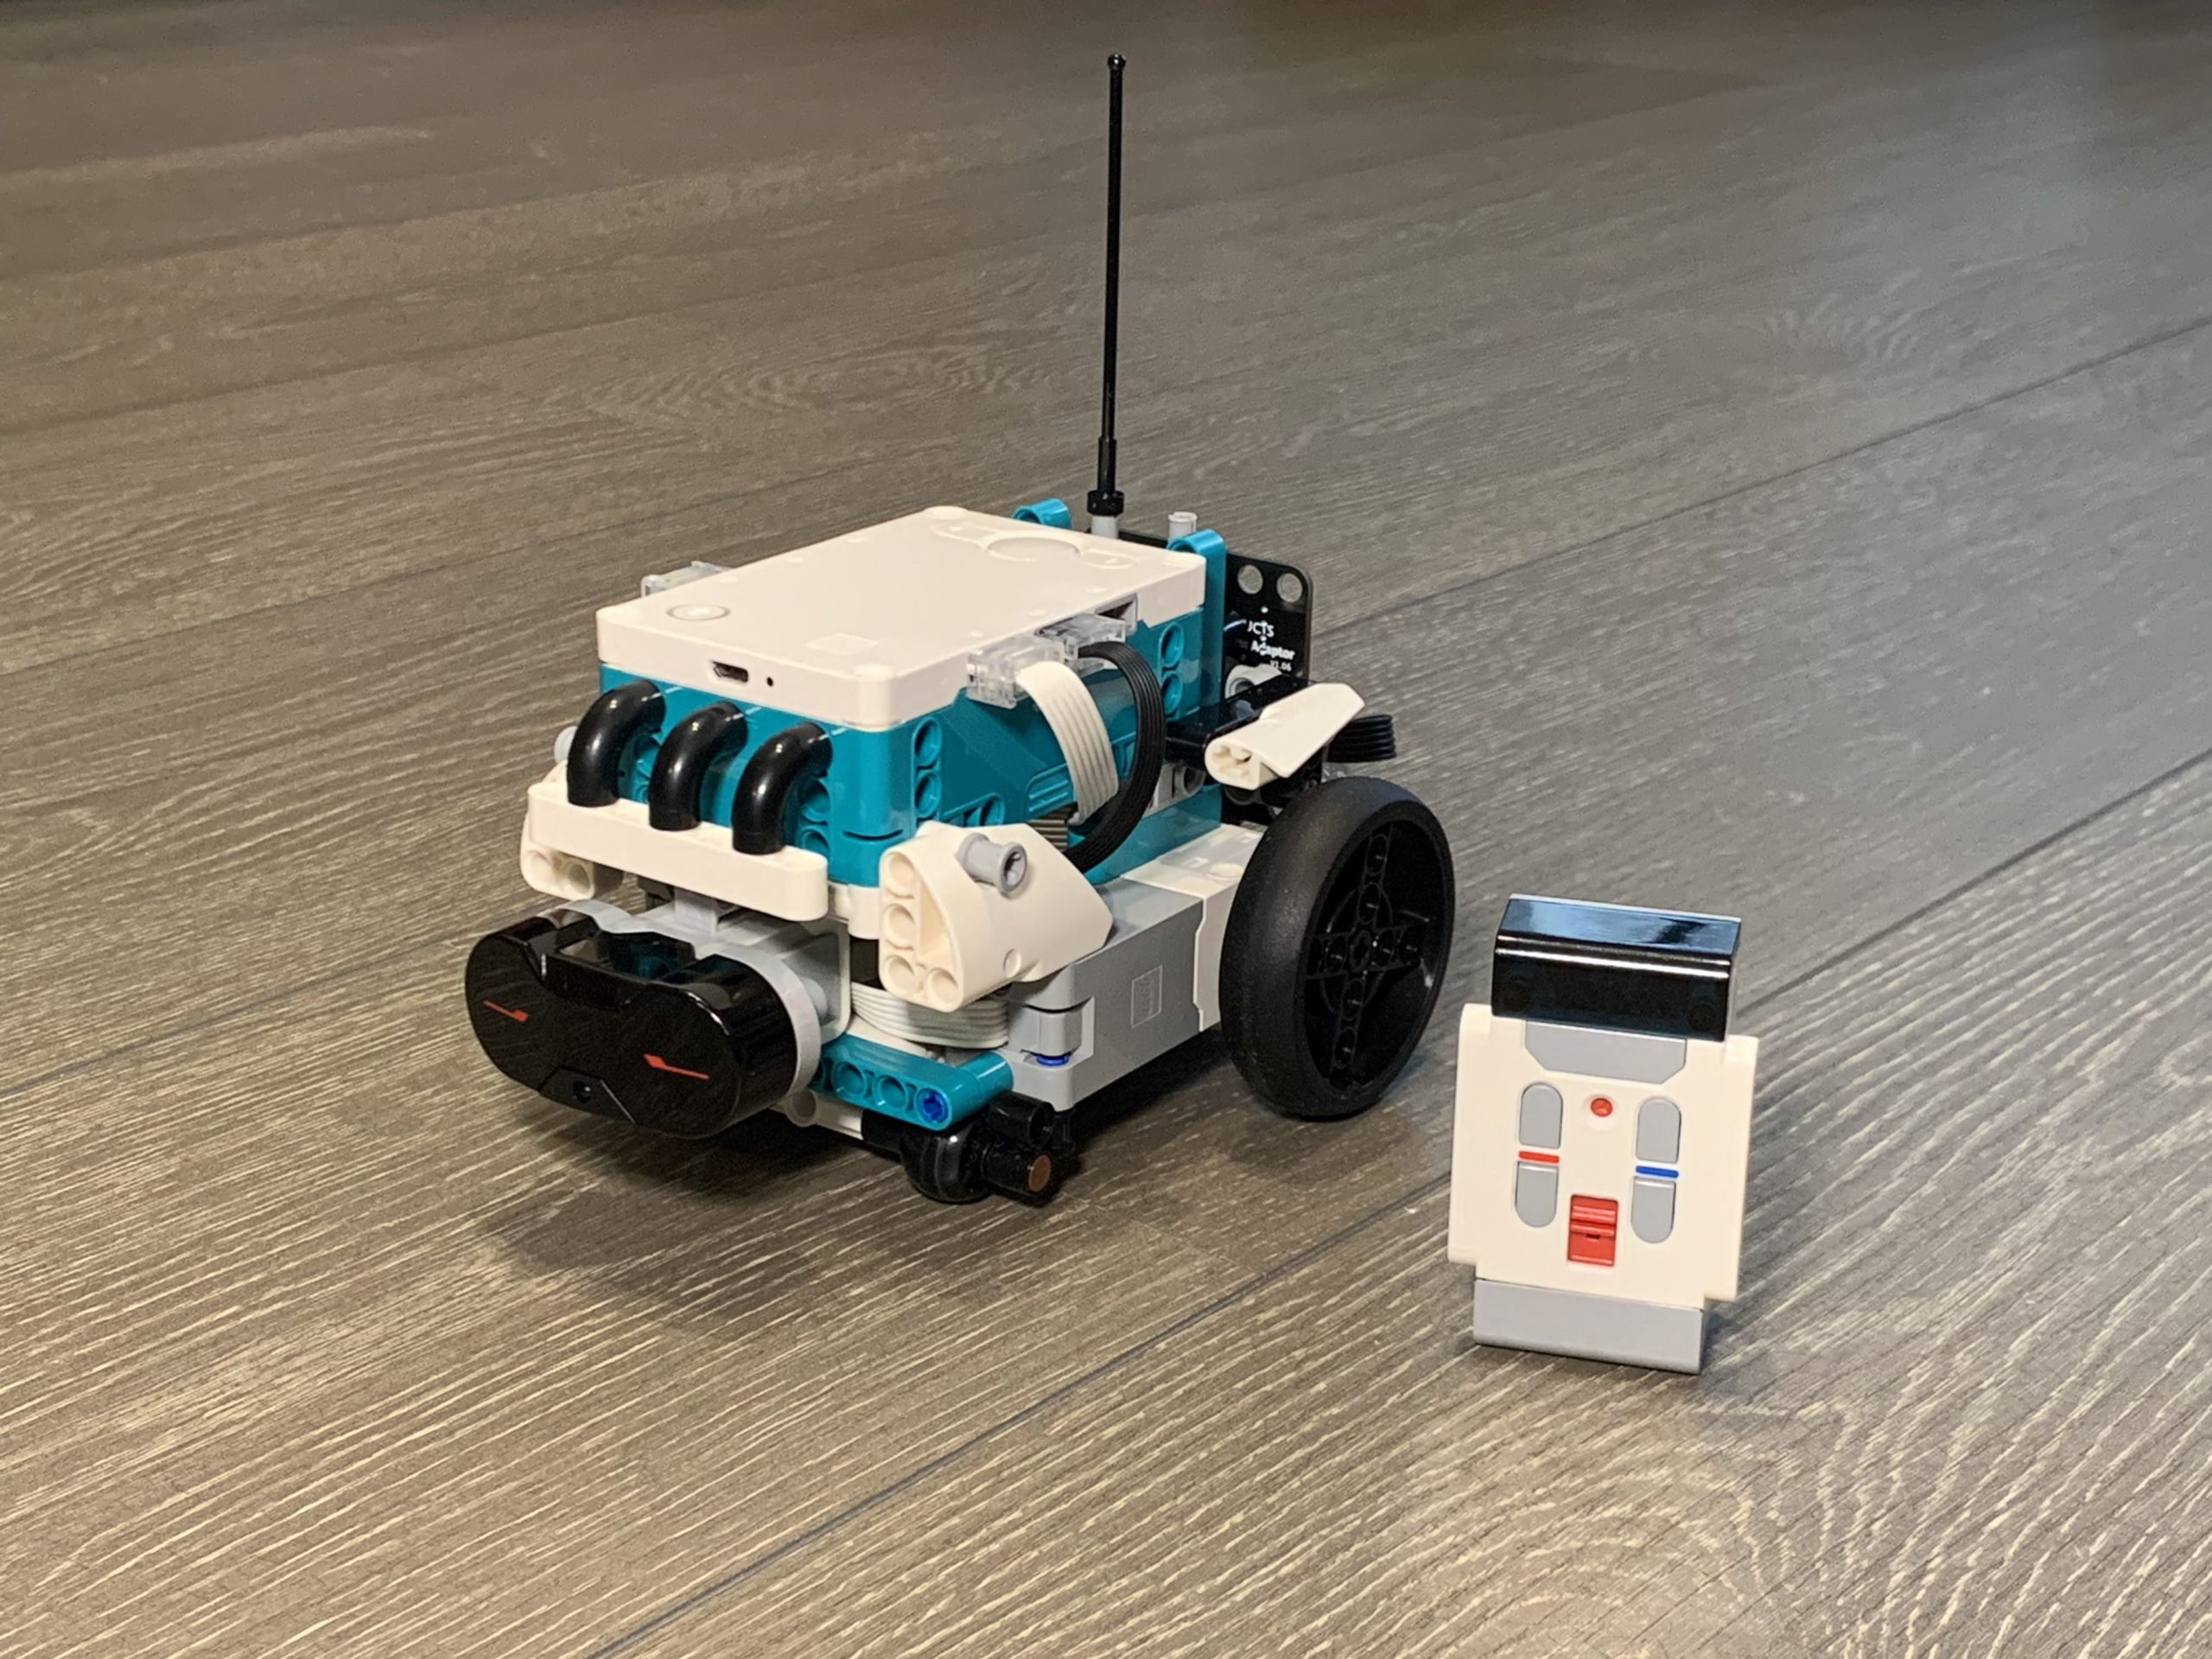
The Beacon Follower
- The EV3 IR sensor has the ability to estimate the general direction (heading) of and the distance (proximity) to the IR Beacon.
- This enables your robot to track and follow another moving object (i.e. the IR Beacon).
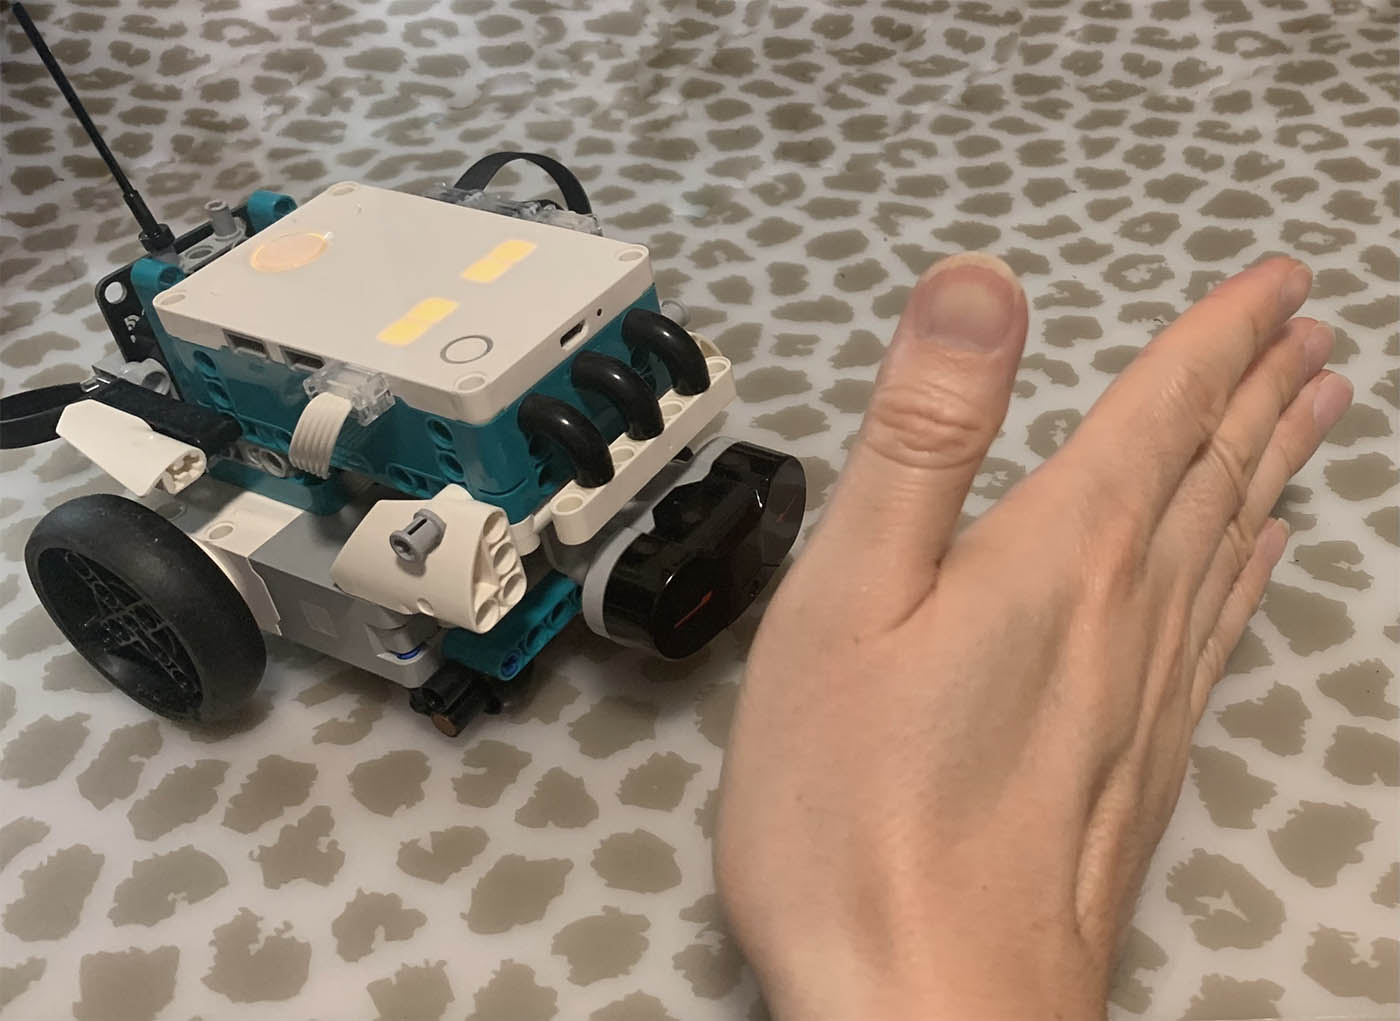
Proximity Distance Estimation
- This is similar to the functionality provided by your Spike Prime Ultrasonic Distance Sensor.
- It is another mean to perform approximate distance measurement.
- Note that in practice, an ultrasonic distance sensor provides more accurate measurement than the IR counterpart.
- Similar to ultrasonic distance sensor, this could be useful for obstacle avoidance.
How to use them on Spike Prime or Robot Inventor?
- Connect your EV3 Infrared (IR) sensor to the bigger socket on the QikEasy Adapter.
- Connect one end of a Spike Prime cable to the smaller socket on the QikEasy Adapter.
- Connect the other end of the Spike Prime cable to one of the 6 ports on the Spike Prime (or Robot Inventor) hub.
- Your Spike Prime or Mindstorms hub will detect the EV3 IR sensor as a Spike Prime Color Sensor.
Simple IR Remote Button Press detection regardless of Channel:
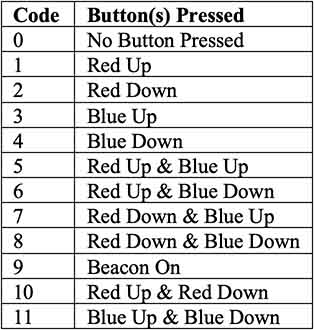
With EV3 IR Sensor being recognized as Color Sensor, to detect the IR Remote Control’s button presses, one can use the Color Value reading change events. This data reading detects one of the 9 different button press patterns of the IR Remote as illustrated below.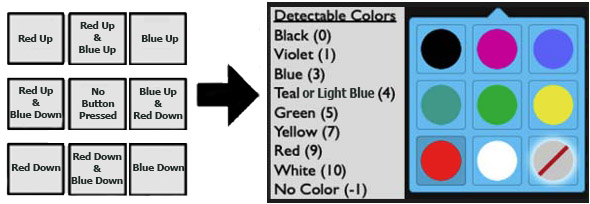
E.g. When your program detects a color value of 10 (White), it means the user has pressed both the Red Down and Blue Down buttons. And, you would probably program the logic to interpret that as “going backwards” or “going downwards”.
Note that using this method, you will not get any channel information for the button press.
The following Word Block example program demonstrates how one would perform this discrete color value detection. The program will light up your hub’s dot matrix LEDs at locations based on the button pattern you pressed.
Note: We could have used the Color Sensor – “when color is” event block for this detection. However, during our development, we found that for whenever the sensor detects a color that matches blue (3) or Teal (4), the “when color is” block would fire both color events. This would not be acceptable for our use case. That’s why we use the “when” event block with condition based on the numeric value of the color being read.
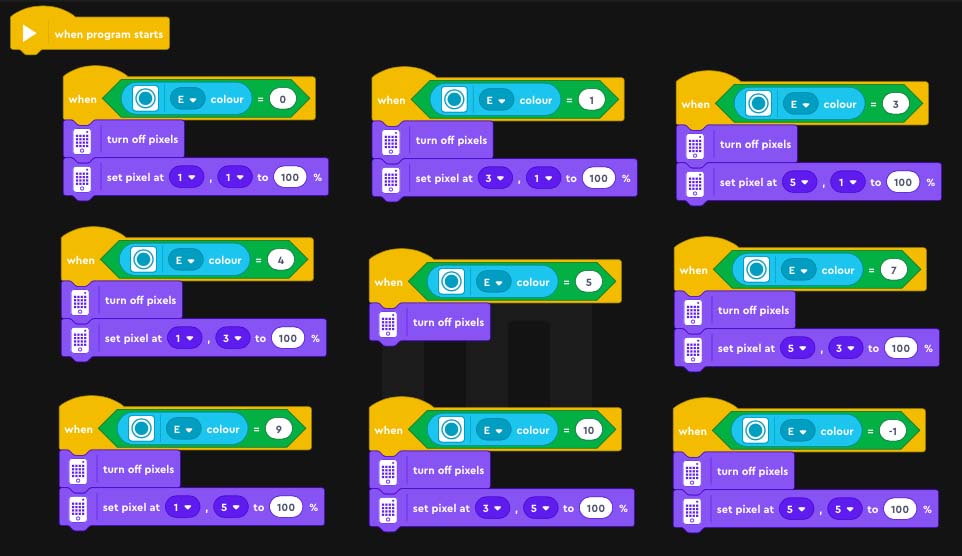
The resulting app will run as follows:
Detecting IR Remote Button Presses for Specific Channel:
To retrieve full information (including Channel) for the IR Remote Control’s button presses, one may use the Raw Red and Raw Green data readings. This data reading provides full information for the IR physical remote button presses including information about the selected channel on your remote control. It works even when buttons on multiple remotes for different channels are pressed at the same time. This scheme allows multiple IR Remotes (each of different channel) to be used in the same environment at the same time.
Button press values for channel 1 (higher bytes) and 2 (lower bytes) are combined and stored in the raw Red data value. Button presses for channel 3 (higher bytes) and 4 (lower bytes) are stored in the raw Green data value. To retrieve the data, the raw Red or Green value will first need to be reduced to the 0 to 256 range first. Then you will grab the higher bytes or lower bytes using this formulas:
- Higher Bytes = Normalized Raw Value / 16
- Lower Bytes= Normalized Raw Value MOD 16
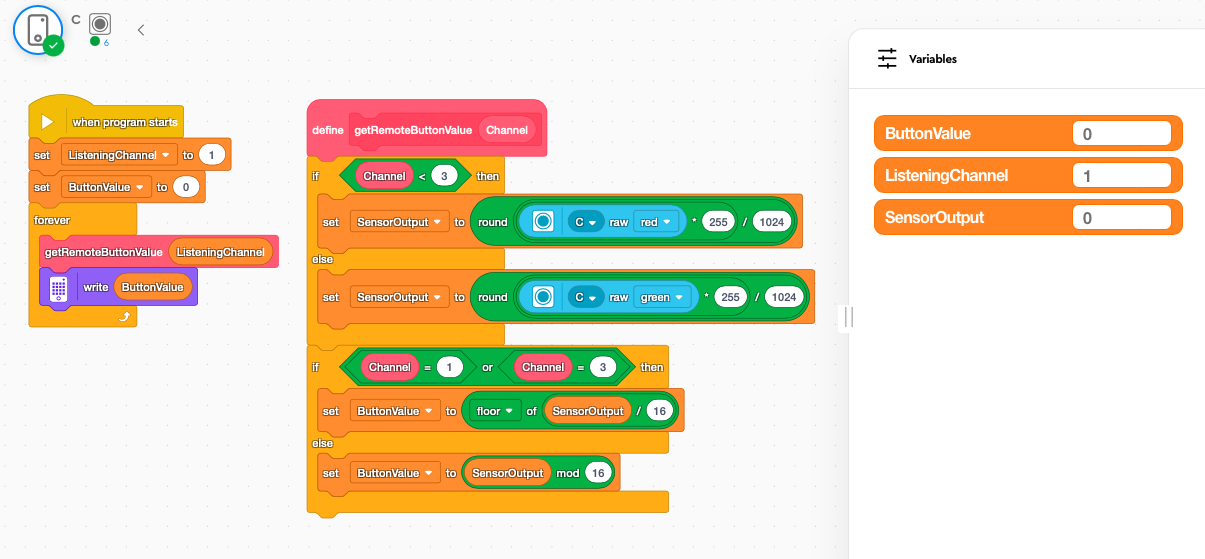
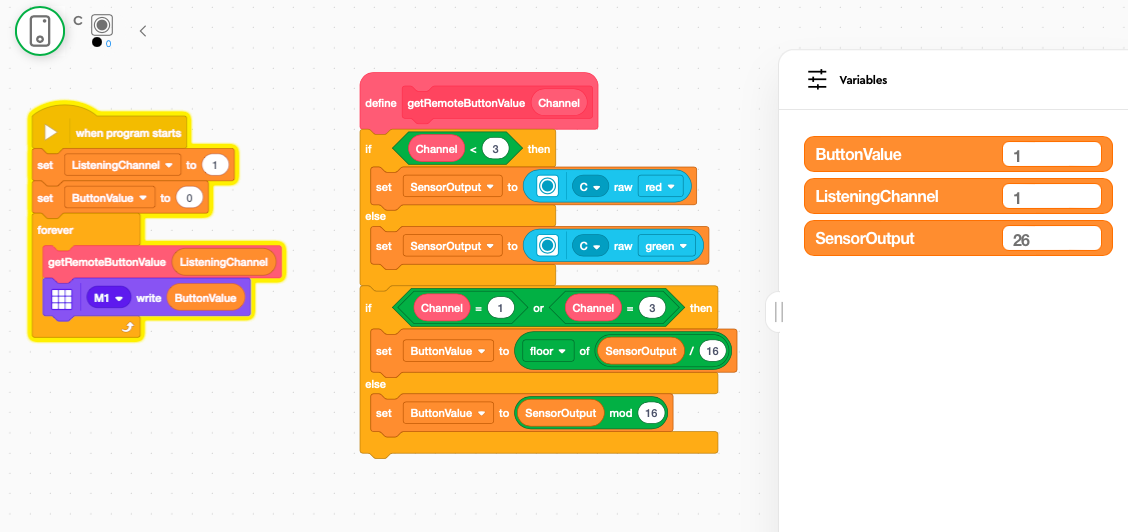
The following example Word Block program shows how one would perform such detection using the formulas above. The program detects the pressing of IR Remote buttons and displays the detected button press value on the Hub’s LEDs.
Note:
- This program requires the following variables to be created first: ButtonValue, ListeningChannel, SensorOutput
- At the beginning of the program, you need to set ListeningChannel to the IR Remote Channel (either 1, 2, 3 or 4) button presses you want to listen for.
For Spike App 3:
Here’s the python version of the same program for Spike App 3:
#================================================================================================
# This program is for testing QikEasy Adapter with the EV3 IR Sensor. It detects the pressing
# of IR Remote buttons and displays the detected button press value on the Hub's LEDs.
#
# The program will detect button pressing only on the channel specified by the global
# variable "listeningChannel".
#================================================================================================
import color_sensor
import time
from hub import port, light_matrix

#================================================================================================
# Note that the variable listeningChannel's representation is different from the physical channel
# number on the IR Remote control.  listeningChannel value should be 1 less than the physial
# channel number.  For example, when the physical button is at "2", you should set this variable
# to 1.
#================================================================================================
listeningChannel = 1

#================================================================================================
# Get IR-REMOTE button pressed code based on rgb data array, and the IR Remote's expect channel.
#
# Returns the button press code.
#================================================================================================
def getIrRemoteButtonCodeFromRgbData( channel):
    rgbData = color_sensor.rgbi(port.C)
    sensorOutput = 0
    if (channel>=0 and channel<=3):
        if ( channel<=1 ):      # For channel 0 and 1 (i.e. physical channels 1 and 2 )
            sensorOutput = round((rgbData[0] * 255) / 1024)
        else:                   # For channel 1 and 2 (i.e. physical channels 3 and 4 )
            sensorOutput = round((rgbData[1] * 255) / 1024)

        if (channel%2==0):      # For channel 0 and 2 (i.e. physical channel 1 and 3)
            return sensorOutput >> 4
        else:                   # For channel 1 and 3 (i.e. physical channel 2 and 4)
            return sensorOutput & 0b1111
    else:
        return -1


#=========================
# Main code starts here
#=========================
last_remote_code = -1
while True:
    current_ir_remote_code = getIrRemoteButtonCodeFromRgbData(listeningChannel)

    # ignore any erroneous code that is not in the valid range
    if ( current_ir_remote_code < 12 ):
        # If no current IR code detected OR remote code changed, clear display
        if current_ir_remote_code == -1 or current_ir_remote_code == 0 or last_remote_code != current_ir_remote_code:
            light_matrix.clear()

        # Only redraw if the button code changes from what was last pressed
        if current_ir_remote_code!=-1 and last_remote_code != current_ir_remote_code:
            light_matrix.write(str(current_ir_remote_code))

        # Remember the current remote code in the last_remote_code variable
        last_remote_code = current_ir_remote_code
For Spike App 2:
Here’s the Spike App 2 Word Block program. The code is basically the same. The only difference is in the way the raw RGB values are sent to the Word Block program. For Spike App 2, each RGB value is in the range of 0 to 255. For Spike App 3, each value gets the full range from 0 to 1024.
Here’s the python version of the same program for Spike App 2:
#================================================================================================
# This program is for testing QikEasy Adapter with the EV3 IR Sensor. It detects the pressing
# of IR Remote buttons and displays the detected button press value on the Hub's LEDs.
#
# The program will detect button pressing only on the channel specified by the global
# variable "listeningChannel".
#================================================================================================
from spike import ColorSensor
from spike import PrimeHub
import time
from hub import port

hub = PrimeHub()

#================================================================================================
# Note that the variable listeningChannel's representation is different from the physical channel
# number on the IR Remote control.listeningChannel value should be 1 less than the physial
# channel number.For example, when the physical button is at "2", you should set this variable
# to 1.
#================================================================================================
listeningChannel = 3


#================================================================================================
# Get IR-REMOTE button pressed code based on rgb data array, and the IR Remote's expect channel.
#
# Returns the button press code.
#================================================================================================
def getIrRemoteButtonCodeFromRgbData( channel):
    color_sensor = ColorSensor('C')
    rgbData = color_sensor.get_rgb_intensity()
    sensorOutput = 0
    if (channel>=0 and channel<=3):
        if ( channel<=1 ):    # For channel 0 and 1 (i.e. physical channels 1 and 2 )
            sensorOutput = round((rgbData[0] * 255) / 1024)
        else:                # For channel 1 and 2 (i.e. physical channels 3 and 4 )
            sensorOutput = round((rgbData[1] * 255) / 1024)

        if (channel%2==0):    # For channel 0 and 2 (i.e. physical channel 1 and 3)
            return sensorOutput >> 4
        else:                # For channel 1 and 3 (i.e. physical channel 2 and 4)
            return sensorOutput & 0b1111
    else:
        return -1


#=========================
# Main code starts here
#=========================
last_remote_code = -1
while True:
    current_ir_remote_code = getIrRemoteButtonCodeFromRgbData(listeningChannel)

    # ignore any erroneous code that is not in the valid range
    if ( current_ir_remote_code < 12 ):
        # If no current IR code detected OR remote code changed, clear display
        if current_ir_remote_code == -1 or current_ir_remote_code == 0 or last_remote_code != current_ir_remote_code:
            hub.light_matrix.off()

        # Only redraw if the button code changes from what was last pressed
        if current_ir_remote_code!=-1 and last_remote_code != current_ir_remote_code:
            hub.light_matrix.write(str(current_ir_remote_code))

        # Remember the current remote code in the last_remote_code variable
        last_remote_code = current_ir_remote_code
The defined code values for the Button Presses are as follows:
Distance Proximity Estimation:
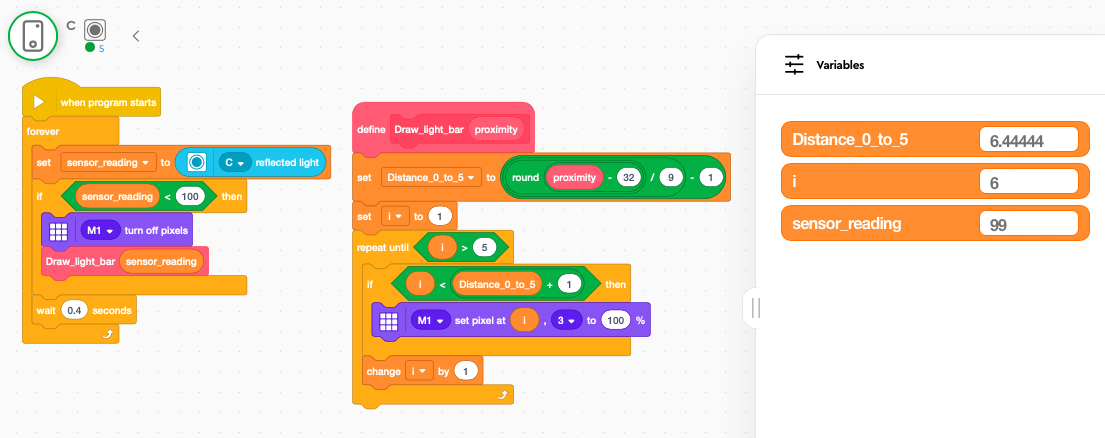
You can use the Reflected Light value to access the distance proximity feature. This data reading is in the range from 0 to 100, representing the object’s approximate distance from the sensor.
The following example Word Block program shows how one would perform such detection. This program draws a horizontal bar on the LED Matrix of the hub based on the distance of the object from the sensor. In this program, we defined a custom block “Draw_light_bar” that takes a number in the range of 0 to 100 as a parameter. It scales the number down to 0 to 5 range and draw a light bar on the LED display.
Here’s the equivalent Python program for Spike App 3:
#================================================================================================
# This program is for testing QikEasy Adapter with the EV3 IR Sensor. It detects the
# proximity of the IR Beacon (regardless of channel) and draws a bar on the LED matrix.
#================================================================================================
import color_sensor
import time
import math
from hub import port, light_matrix


#================================================================================================
# Draws a bar on LED Matrix with length based on proximity value
# Pre-condition:
#   - barLength must be between 0 and 99 for anything to be drawn.
#   - The bottom row must have already been cleared before calling this.
#================================================================================================
def drawBar(proximity):
    if proximity>=0 and proximity<=99:
        barLength = ( round( proximity - 32) / 9 ) - 1
        for i in range(5):
            if (i<barLength):
                light_matrix.set_pixel( i, 2, 100)


##################################
# MAIN Program starts here
##################################
while(1):
    proximity =  color_sensor.reflection(port.C)
    if ( proximity <= 99):
        light_matrix.clear()
        print( proximity)
        drawBar( proximity )

    # Give the LED pixels enough time to light up.  Avoids flickering.
    time.sleep_ms(300)
And here’s the Python version of the program for Spike App 2:
#================================================================================================
# This program is for testing QikEasy Adapter with the EV3 IR Sensor. It detects the
# proximity of the IR Beacon (regardless of channel) and draws a bar on the LED matrix.
#================================================================================================
from spike import PrimeHub, LightMatrix, ColorSensor
from spike.control import wait_for_seconds, wait_until, Timer
import math

hub = PrimeHub()

#================================================================================================
# Draws a bar on LED Matrix with length based on proximity value
# Pre-condition:
#- barLength must be between 0 and 100 for anything to be drawn.
#- The bottom row must have already been cleared before calling this.
#================================================================================================
def drawBar(proximity):
    if proximity>=0 and proximity<=99:
        barLength = ( round( proximity - 32) / 9 ) - 1
        for i in range(5):
            if (i<barLength):
                hub.light_matrix.set_pixel( i, 2, 100)


##################################
# MAIN Program starts here
##################################
while(1):
    proximity =ColorSensor('C').get_reflected_light()
    if ( proximity <= 99):
        hub.light_matrix.off()
        drawBar( proximity )

    # Give the LED pixels enough time to light up.Avoids flickering.
    wait_for_seconds(0.1)
IR Beacon Seek:
The EV3 IR Sensor has the ability to estimate the general direction (heading) of and the distance (proximity) to the IR Beacon. One can use this functionality to implement a robotic vehicle that follows the IR Beacon. It is important to note that even with the QikEasy Adapter, this feature is only available to Spike Prime and Robotic Inventor when you program in Python. Word Block is not supported.
To use the channel, heading direction and distance information, the user program has to read the sensor’s data value array in Mode 7. This data array contains 3 values as described below:
- The 4 channels of data are encoded into the Blue and Intensity of the raw RGBI values.
- Raw Blue value contains the Channel 0 and 1 data values (which are channel 1 and 2 on the IR Remote switch).
- Raw Intensity value contains the Channel 2 and 3 data values (which are channel 3 and 4 on the IR Remote switch).
- With 10 bits (0 to 1024) available, we use 5 bits to store each channel’s direction & distance pair. And within each distance pair, the heading direction takes up 3 bits, and the distance takes up 2 bits.
- Heading Direction:
Takes up 3 bits. The return value ranges from 0 to 7. The normal direction reading range from 0 to 6, where 3 is the center point, 0 means the beacon is towards the far-left side, and 6 means that the beacon is towards the far right side. A value of 7 has the special meaning that either the measurement is invalid for this channel, or no beacon is detected. - Distance:
Takes up 2 bits. The return value ranges from 0 to 3. A 3 indicates that the beacon is very far away. And a 0 or 1 indicates that the beacon is very close.
Below is an example program that demonstrates this IR Beacon Seek functionality in Python. This example shows a dial the LED Matrix display to indicate direction. In addition, it displays a horizontal bar at the bottom to indicate distance. This example works for the channel you specified in the program. To test out the program, you must modify the “beaconChannel” variable in the main program to the channel set on your IR Beacon. The channel no. in the program is always shifted by 1. E.g. Channel 0 in the program corresponds to Channel 1 of the physical remote.
This is the Spike App 3 version:
#================================================================================================
# This program is for testing QikEasy Adapter with the EV3 IR Sensor.  It detects the
# direction and distance of the IR Beacon (of specific channel) from the IR Sensor.
#
# Before running the program, make sure you first set the beacon channel number at the
# beginning of the main program.
#================================================================================================
import color_sensor
import time
from hub import port, light_matrix


#================================================================================================
# Draws Direction Dial on the first 2 rows of LED Matrix based on input parameter
# Pre-conditions:
#   - dir must be between -3 and 3 for anything to be drawn
#   - The first 2 rows must have already been cleared before calling this.
#================================================================================================
def drawDirection(dir):
    if dir>=-3 and dir<=3:
        if (dir==-3):
            light_matrix.set_pixel( 0, 1, 100)
        elif (dir==3):
            light_matrix.set_pixel( 4, 1, 100)
        else:
            light_matrix.set_pixel( dir+2, 0, 100)


#================================================================================================
# Draws a bar with length on the bottom row of LED Matrix based on input parameter
# Pre-condition:
#   - barLength must be between 0 and 3 for anything to be drawn.
#   - The bottom row must have already been cleared before calling this.
#================================================================================================
def drawDistanceBar(barLength):
    if barLength>=0 and barLength<=3:
        for i in range(5):
            if (i<barLength):
                light_matrix.set_pixel( i, 4, 100)

#================================================================================================
# Get [Direction, Distance] tuple from rgb data array, and the IR Beacon's expect channel no.
# The return values in the returned tuple have the following properties:
#   Direction:  ranges from -3 to 3          OR -99 if data is invalid
#   Distance:   ranges from 0 to 4           OR -99 if data is invalid
#================================================================================================
def getDirDistancePairFromRgbData( rgbData, channel):
    # Retrieve IR Sensor data from specific Beacon channel from simulated Color Sensor RGB measurements
    if (channel>=0 and channel<=3):
        if (channel%2 == 0):
            channelData = ( rgbData[2 + channel//2 ] >> 5 )
        else:
            channelData = ( rgbData[2 + channel//2 ] & 0b11111 )

        # Decode "Direction" and "Distance" from IR Sensor data
        direction = channelData >> 2
        distance = channelData & 0b11

        # Direction value of 7 is specifically for invalid sensor data
        if (direction!=7):
            return [direction-3, distance]

    return [-99, -99]


##################################
# MAIN Program starts here
##################################
while(1):
    # Make sure you set the Beacon Channel before running the program
    beaconChannel = 0

    dirDistPair = getDirDistancePairFromRgbData( color_sensor.rgbi(port.C), beaconChannel )
    light_matrix.clear()
    drawDirection( dirDistPair[0] )
    drawDistanceBar( dirDistPair[1] )

    # Give the LED pixels enough time to light up.Avoids flickering.
    time.sleep_ms(1)
And, here’s the Spike App 2 version:
#================================================================================================
# This program is for testing QikEasy Adapter with the EV3 IR Sensor.It detects the
# direction and distance of the IR Beacon (of specific channel) from the IR Sensor.
#
# Before running the program, make sure you first set the beacon channel number at the
# beginning of the main program.
#================================================================================================
from spike import PrimeHub, LightMatrix, ColorSensor
from spike.control import wait_for_seconds, wait_until, Timer
import math

hub = PrimeHub()


#================================================================================================
# Draws Direction Dial on the first 2 rows of LED Matrix based on input parameter
# Pre-conditions:
#- dir must be between -3 and 3 for anything to be drawn
#- The first 2 rows must have already been cleared before calling this.
#================================================================================================
def drawDirection(dir):
    if dir>=-3 and dir<=3:
        if (dir==-3):
            hub.light_matrix.set_pixel( 0, 1, 100)
        elif (dir==3):
            hub.light_matrix.set_pixel( 4, 1, 100)
        else:
            hub.light_matrix.set_pixel( dir+2, 0, 100)


#================================================================================================
# Draws a bar with length on the bottom row of LED Matrix based on input parameter
# Pre-condition:
#- barLength must be between 0 and 3 for anything to be drawn.
#- The bottom row must have already been cleared before calling this.
#================================================================================================
def drawDistanceBar(barLength):
    if barLength>=0 and barLength<=3:
        for i in range(5):
            if (i<barLength):
                hub.light_matrix.set_pixel( i, 4, 100)

#================================================================================================
# Get [Direction, Distance] tuple from rgb data array, and the IR Beacon's expect channel no.
# The return values in the returned tuple have the following properties:
#Direction:ranges from -3 to 3        OR -99 if data is invalid
#Distance:ranges from 0 to 4        OR -99 if data is invalid
#================================================================================================
def getDirDistancePairFromRgbData(channel):
    color_sensor = ColorSensor("C")
    rgbData = [color_sensor.get_blue(), color_sensor.get_rgb_intensity()]

    # Retrieve IR Sensor data from specific Beacon channel from simulated Color Sensor RGB measurements
    if (channel>=0 and channel<=3):
        if (channel%2 == 0):
            channelData = ( rgbData[ channel//2 ] >> 5 )
        else:
            channelData = ( rgbData[ channel//2 ] & 0b11111 )

        # Decode "Direction" and "Distance" from IR Sensor data
        direction = channelData >> 2
        distance = channelData & 0b11

        # Direction value of 7 is specifically for invalid sensor data
        if (direction!=7):
            return [direction-3, distance]

    return [-99, -99]


##################################
# MAIN Program starts here
##################################
while(1):
    # Make sure you set the Beacon Channel before running the program
    beaconChannel = 0

    dirDistPair = getDirDistancePairFromRgbData( beaconChannel )
    hub.light_matrix.off()
    drawDirection( dirDistPair[0] )
    drawDistanceBar( dirDistPair[1] )

    # Give the LED pixels enough time to light up.Avoids flickering.
    wait_for_seconds(0.1)